Company Admin
Adding members to your company
Adding members is the most frequent Company Admin task on the Team page. This piece walks the Add Member dialog end to end: opening it, filling the eight fields, choosing a Platform role, granting module access, sending the invite, and what your invitee receives in the welcome email.
For the three-layer module access model that frames the per-member checkboxes shown in this dialog, see CA-01 - What you actually own as Company Admin. For where the Team item lives in the sidebar, see CA-02 - Logging in and your sidebar.
Opening the Team page from the sidebar
Click the Team icon in your sidebar to open the Team page. Only Company Admins see the Team entry.
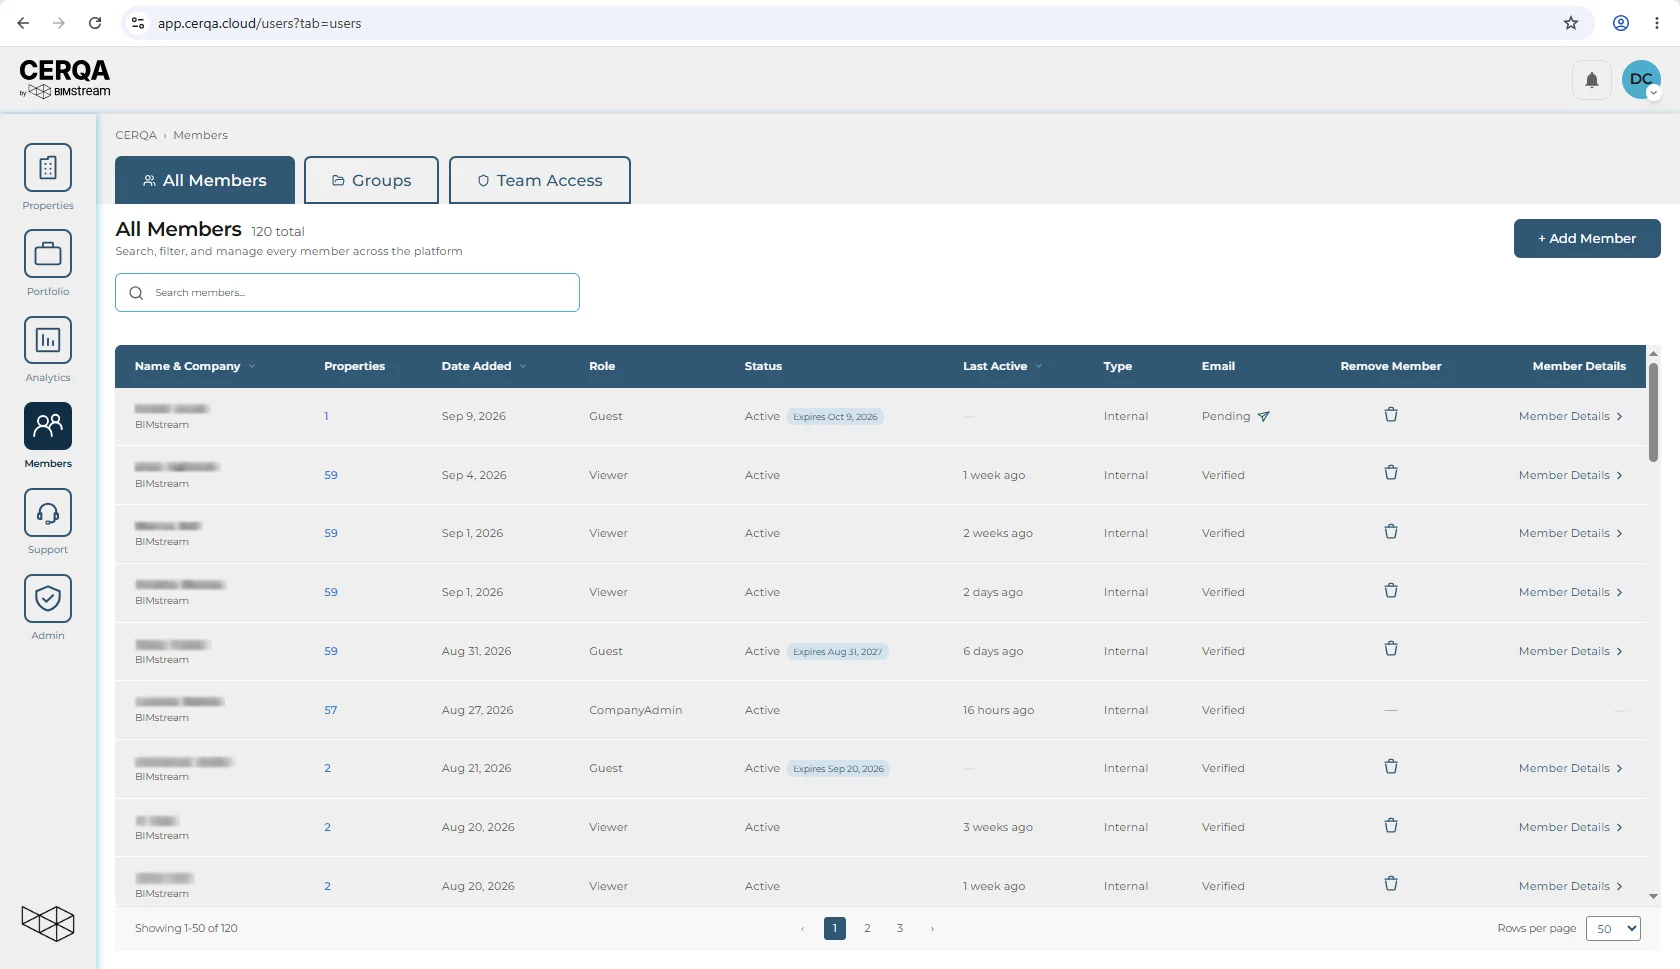
The Team page lists every member in your company with their role, status, and last activity. Add Member sits in the top-right of the page header.
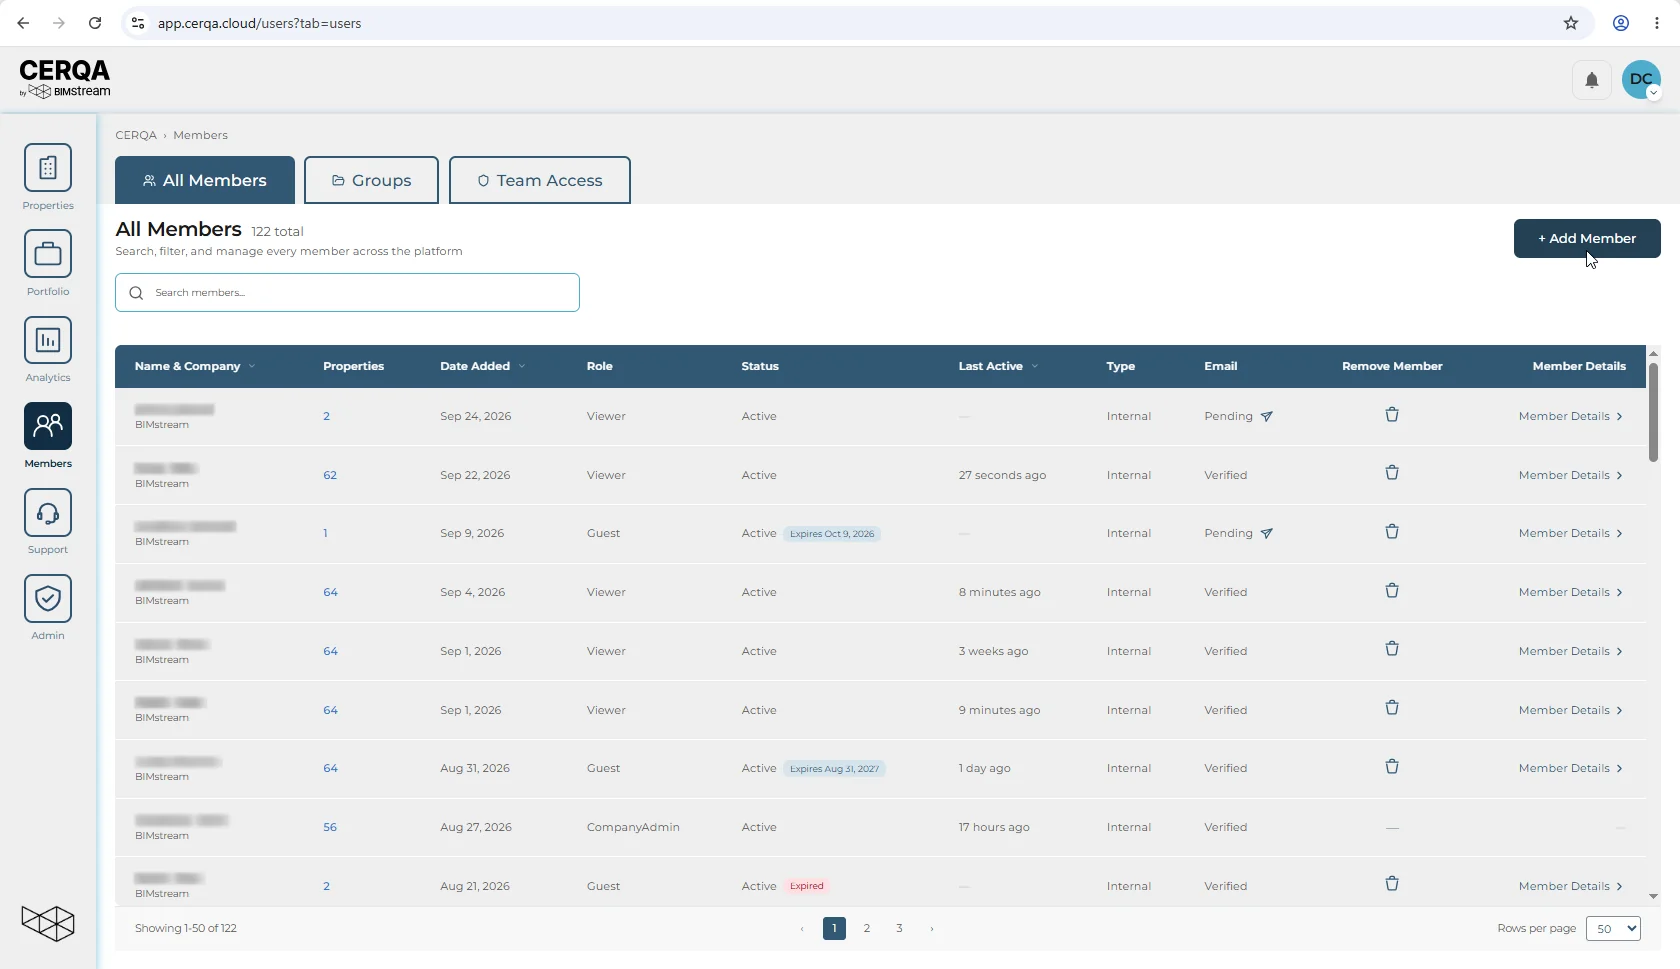
Click Add Member to open the Add New Member dialog.
The Add Member dialog
A dialog titled Add New Member opens with eight fields. Most are required; Properties can be left empty and filled later.
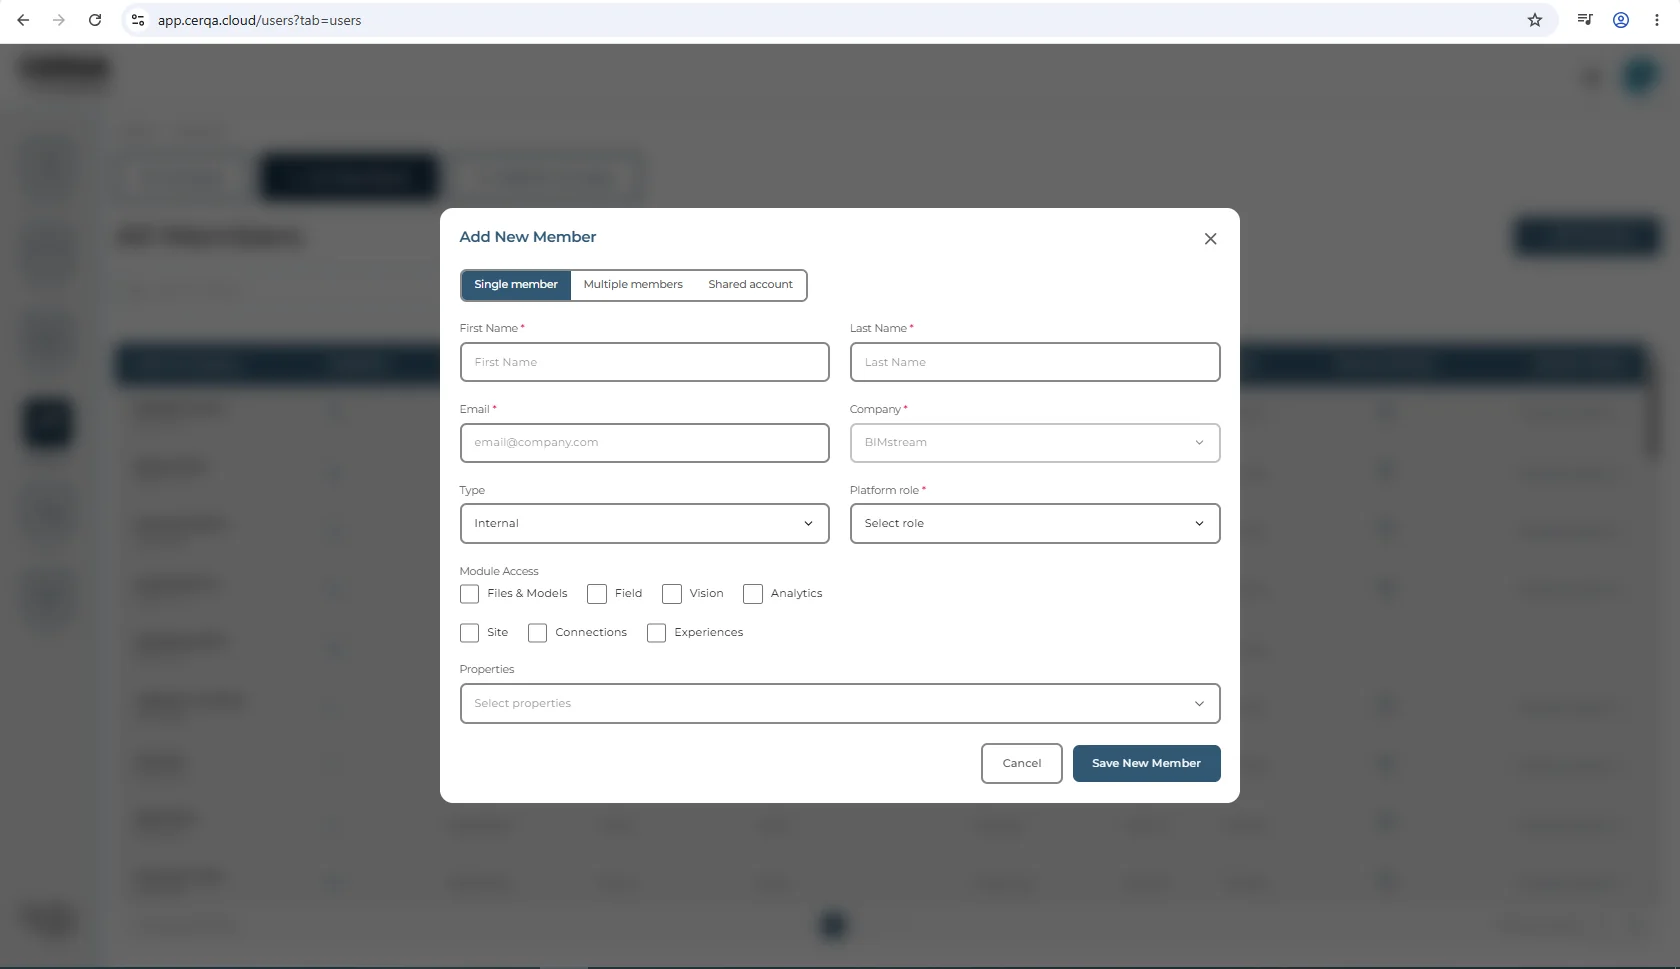
- 1First Name - Required. The invitee's given name.
- 2Last Name - Required. The invitee's family name.
- 3Email - Required. The address the welcome email is sent to.
- 4Company - Defaults to your company. If you manage multiple, the dropdown lets you pick another you have access to.
- 5Type - Internal or External. Categorizes the member; does not change what they can do.
- 6Properties - Multi-select of properties this member can reach. Can stay empty and be filled later via Add Member on a specific property (deep dive in CA-05 - Managing members).
- 7Platform role - Six options for a Company Admin. Covered in the next section.
- 8Module Access - One checkbox per module your company has been granted (the screenshots show a company with every module). All are checked by default. Covered after the next section.
Choosing a role
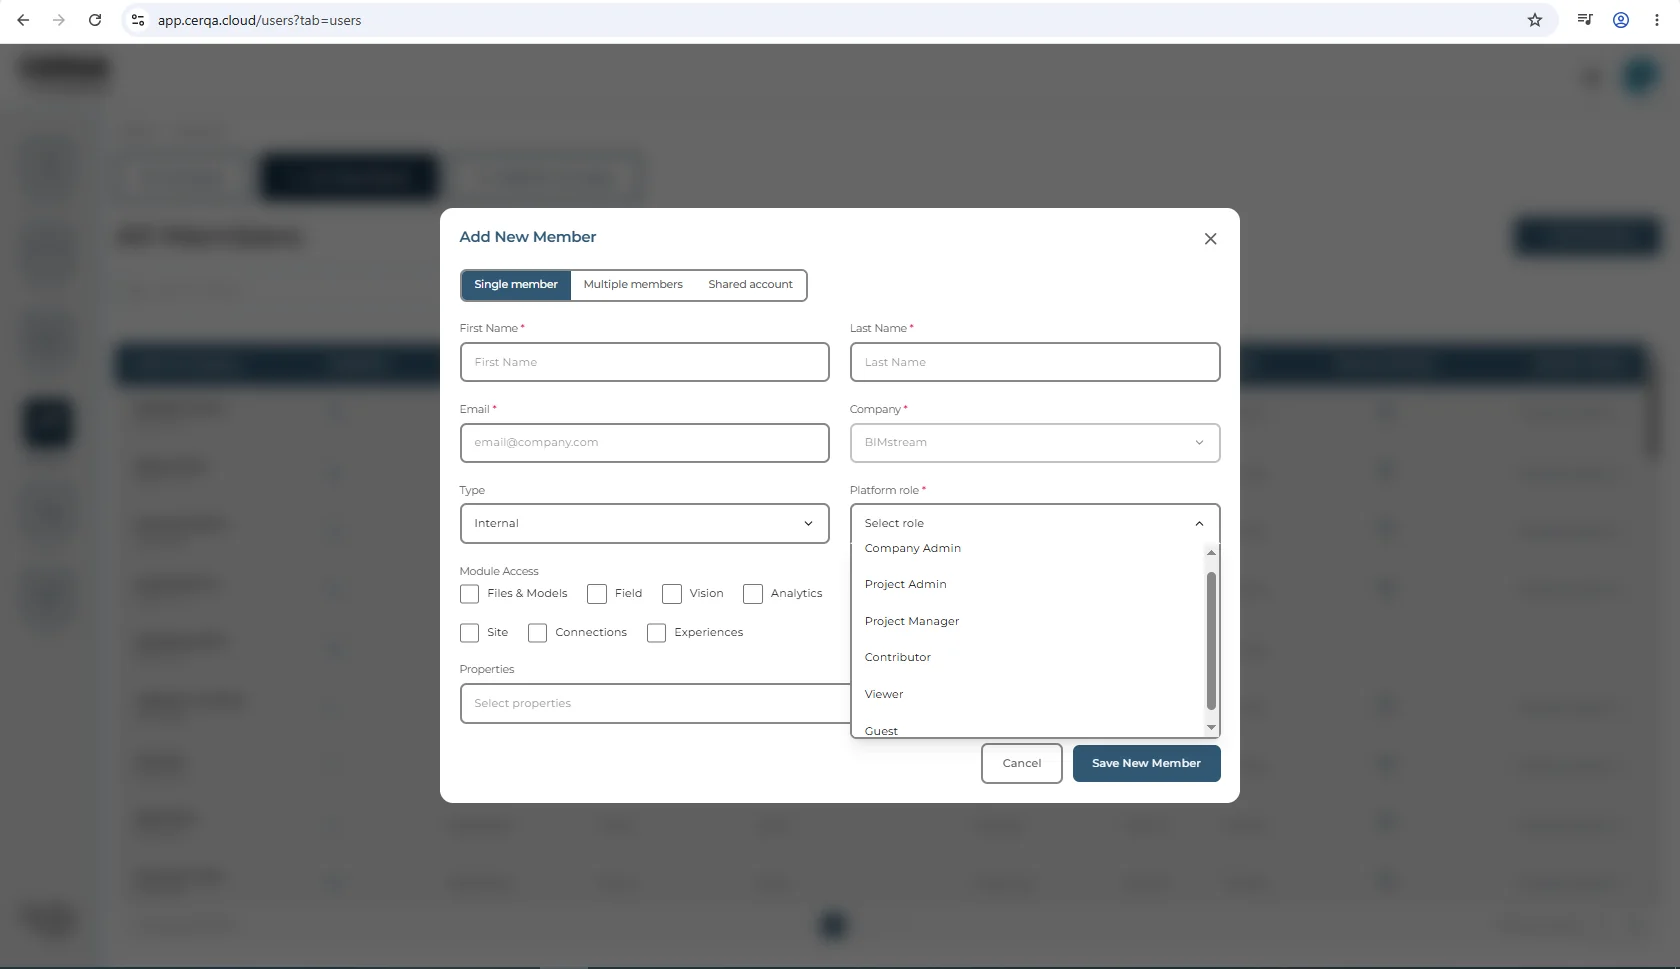
The role dropdown in the Add Member dialog is labeled “Platform role”. As a Company Admin you see six options in this dropdown: Company Admin, Project Admin, Project Manager, Contributor, Viewer, Guest.
Adding a member and changing one follow different rules
When you add a new member, you can assign any role the dropdown offers - Company Admin included. A Company Admin can create another Company Admin in the same company, and the save succeeds. The dropdown is not pre-filtered, and here it does not need to be.
The at-or-above-your-own-level restriction applies when you change an existing member's role, which is a different screen and a different rule: that path rejects a new role equal to or above your own.
Effectively, as a Company Admin adding a new member, you can assign any of the six roles, Company Admin included. Promoting an existing member to Company Admin is the case the hierarchy rule does block - that change is rejected, so it goes through your CERQA Account Manager.
For what each role can see and do across modules and at both company-level and property-level, see F-04 - Roles and permissions. For the role hierarchy explained alongside the three-layer model, see CA-01 - What you actually own as Company Admin.
Choosing module access
Scroll to Module Access. A checkbox appears for each module your company has been granted. Every company sees Files & Models (DOCUMENTS), Field, and Vision; companies with Site (AERIAL), Connections, or Analytics, or Experiences see those checkboxes as well. The company shown in the screenshots has every checkbox. There is no Sustainability checkbox: Sustainability is a section inside the Connections tab, and the Connections grant covers it. All are checked by default. Most modules gate a property tab; Analytics gates the company-wide Analytics sidebar page instead of a property tab; see CA-12 - Analytics - what you can see for that surface.
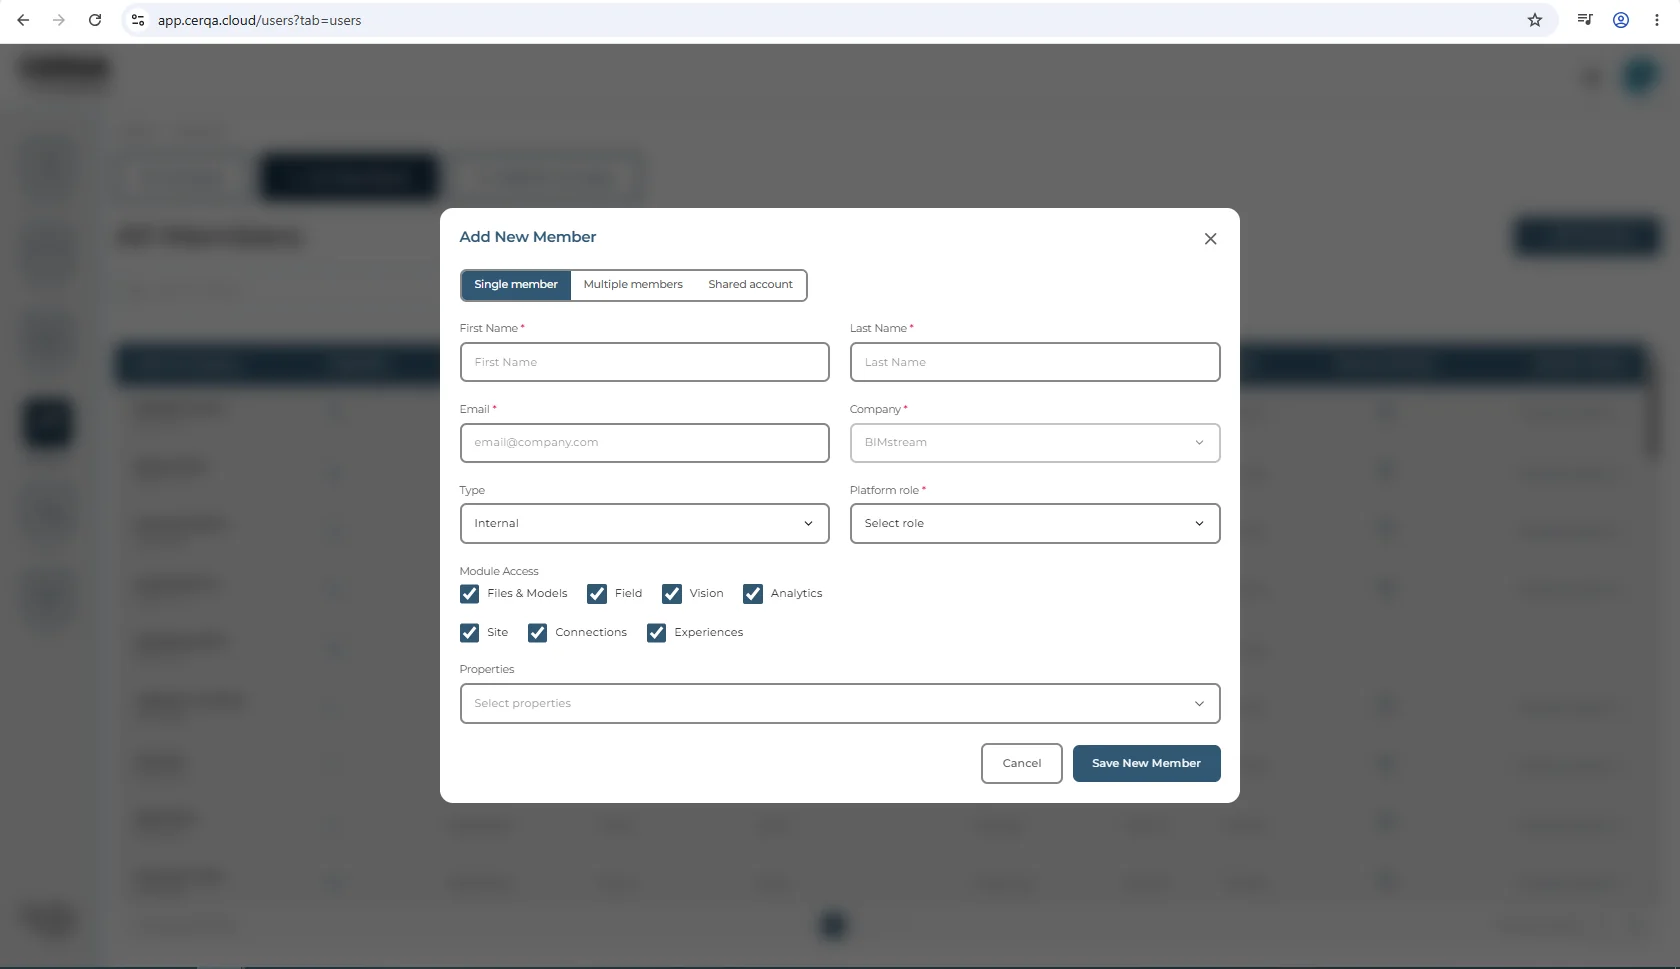
Uncheck a module to remove this member's company-wide access to it. The list itself reflects your company's module grants at the company level; your CERQA Account Manager sets those. If a module your team needs isn't in the list, your company hasn't been granted it and the subscription itself needs to change. See CA-14 - When to call your CERQA Account Manager for that conversation.
For how company-wide module access (Layer 2) stacks with per-property module access (Layer 3), see CA-01 for the three-layer model. For the full module list and the order of operations when access is denied, see CA-07 - Module gating reference.
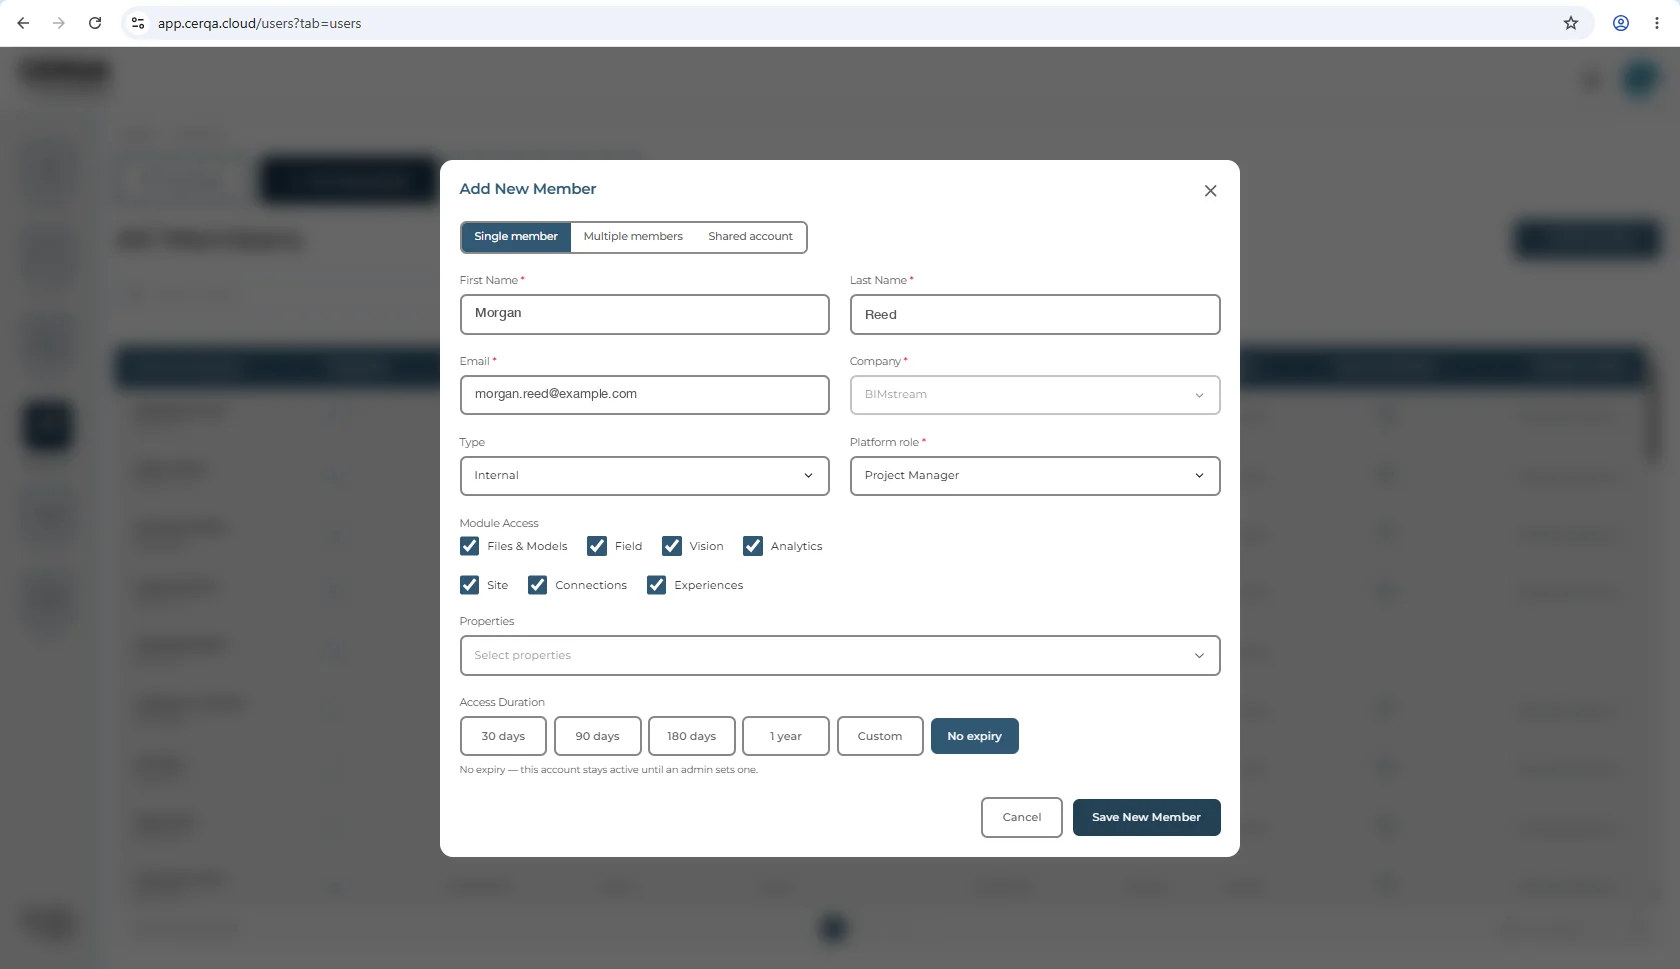
With Platform role and Module Access set, the invitation is ready to send.
Sending the invitation
Click Save New Member. CERQA sends the invitation and the dialog closes. The new member appears in the Team list immediately with a Pending status. They stay Pending until they click the activation link in the welcome email.
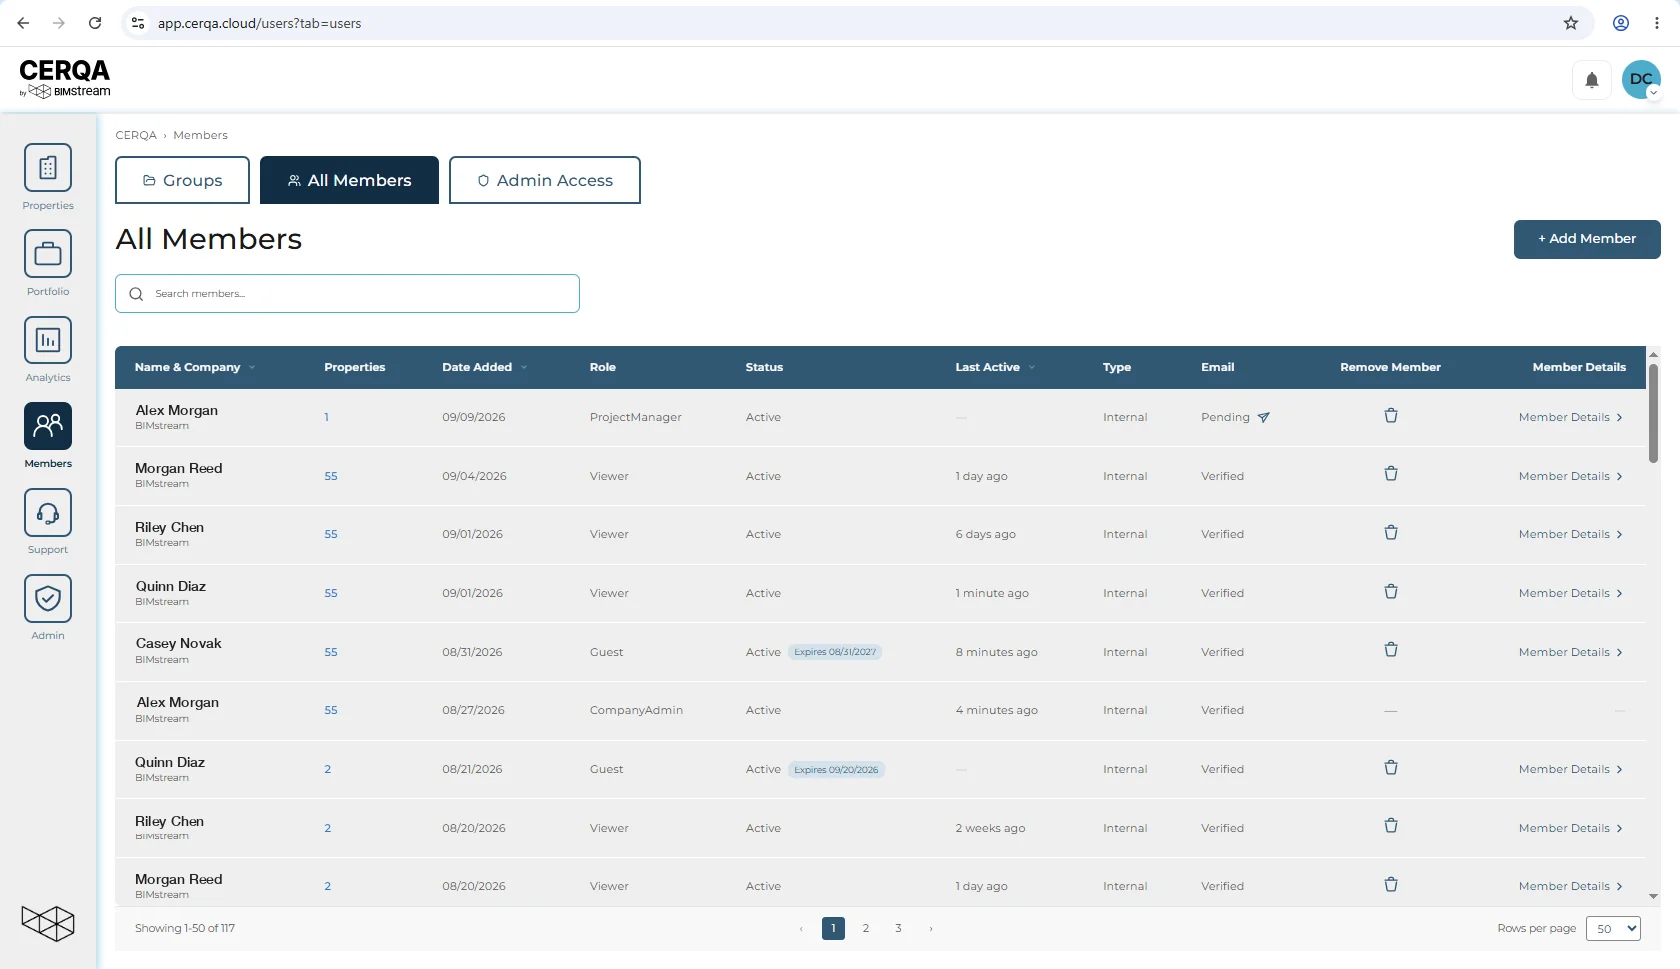
If your invitee hasn't activated yet and reports they didn't receive the email, the row actions on the Pending member let you resend the invitation. The full set of Pending-state actions (resend, change role, deactivate before activation) lives in CA-05 - Managing members.
What your invitee receives
The screenshot below is outside the CERQA UI. It shows the welcome email as your invitee sees it in their inbox. This view is useful when an invitee reports they never received the invitation: you can describe the exact subject line and sender so they can search their inbox and spam folder for it.
Sender address: confirm against a real received email
The invitation typically arrives from a CERQA support address (likely support@cerqa.cloud), but the exact sender can vary. Confirm against an email you have actually received before telling your invitee what address to look for.
The subject line of the welcome email is “Welcome to CERQA – Your Gateway to Enhanced Collaboration”. The body opens with the invitee's first name and asks them to click a button to activate their account and set their password. The button is labeled “Activate Account” and opens the password-set page when clicked. The email closes with the BIMstream logo, social-media links, and a BIMstream Inc copyright.
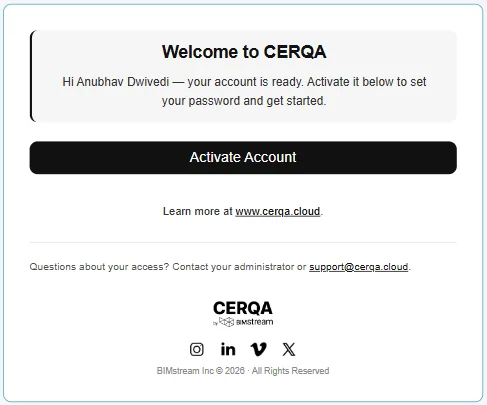
If the email genuinely never arrived after a resend (see CA-05), file a Help & Feedback ticket so support can investigate. See F-05 - Getting Help for the full Help & Feedback flow.