Modules
Files & Models module overview
The Files tab on a property is the surface for the Files & Models module (underlying code DOCUMENTS). It is where drawings, specs, photos, BIM models, and other documents land for the property. This page is the overview: where Files lives, how the tab is laid out, what file types it accepts and at what size limit, which actions carry role gates, and where to go for the deeper flows (sharing, markup, folders + search).
Where Files lives
Files is a per-property tab. Every property in CERQA has its own Files tab; the files are scoped to that property, not company-wide. You reach it by opening a property and clicking the Files tab in the property tab bar.
The tab is the property surface of the Files & Models module. A company subscribes to the module at the company level (Layer 1 of the three-layer access model), Company Admins grant per-member company-wide access (Layer 2), and Project Admins add specific members to specific properties (Layer 3). The tab itself appears for every signed-in role once the subscription is on; what you can DO inside is role-gated (see the Role-gated actions section below).
For module subscription details, see CA-07 - Module gating reference.
The file list and breadcrumb navigation
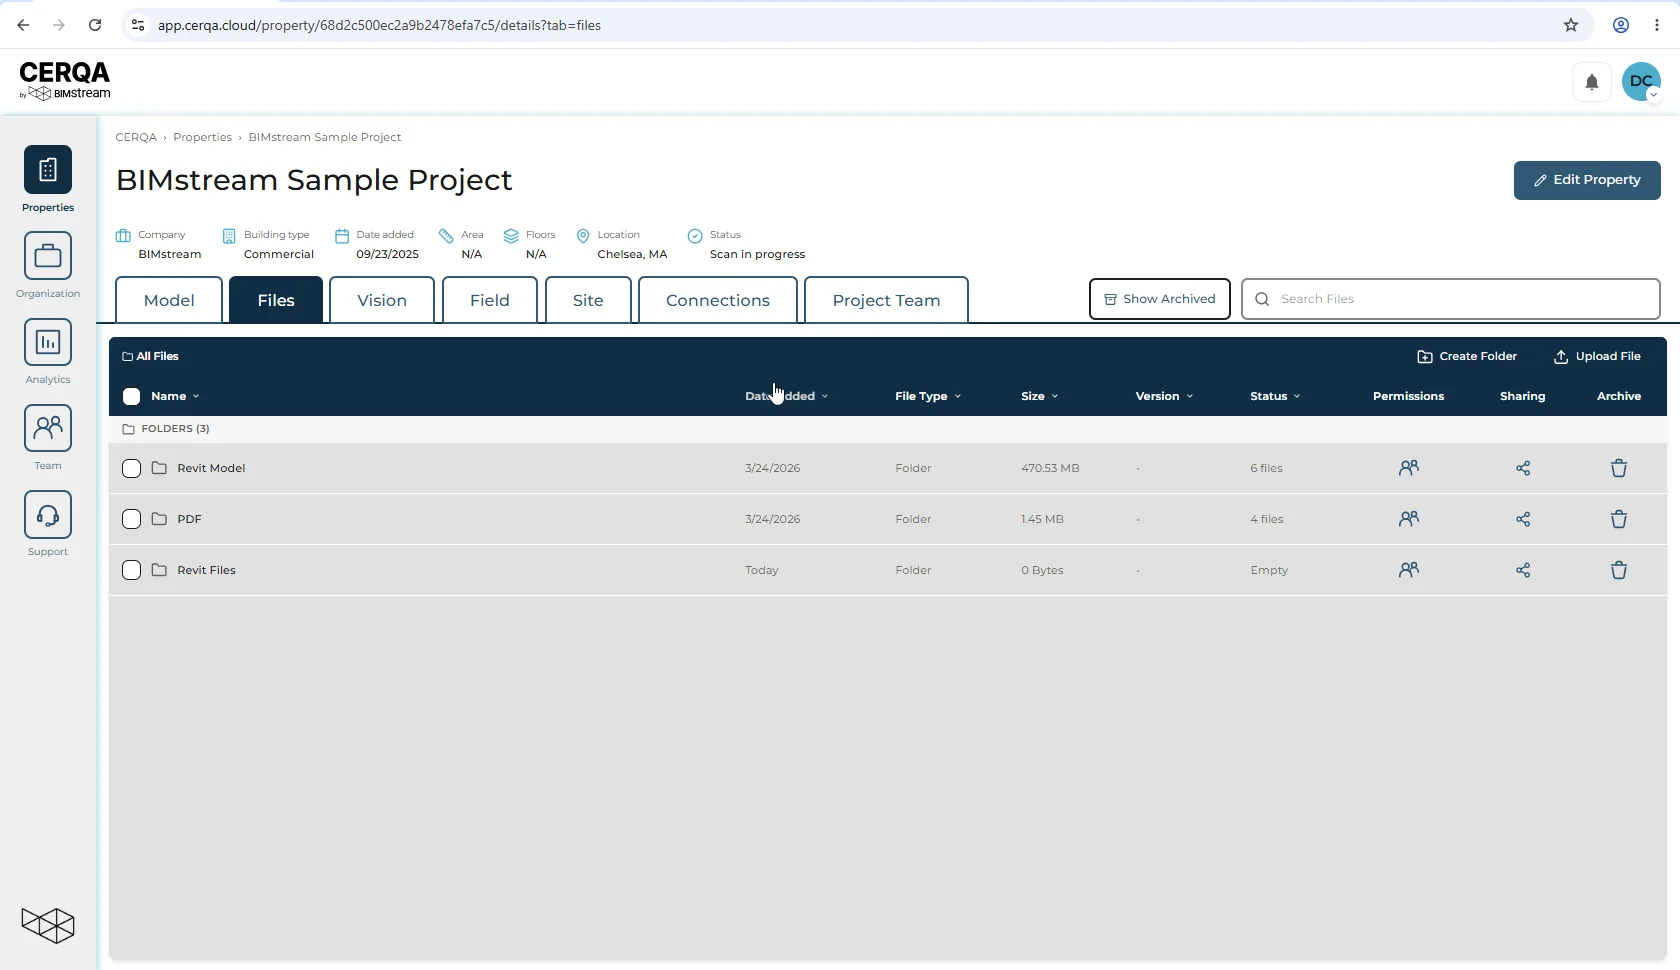
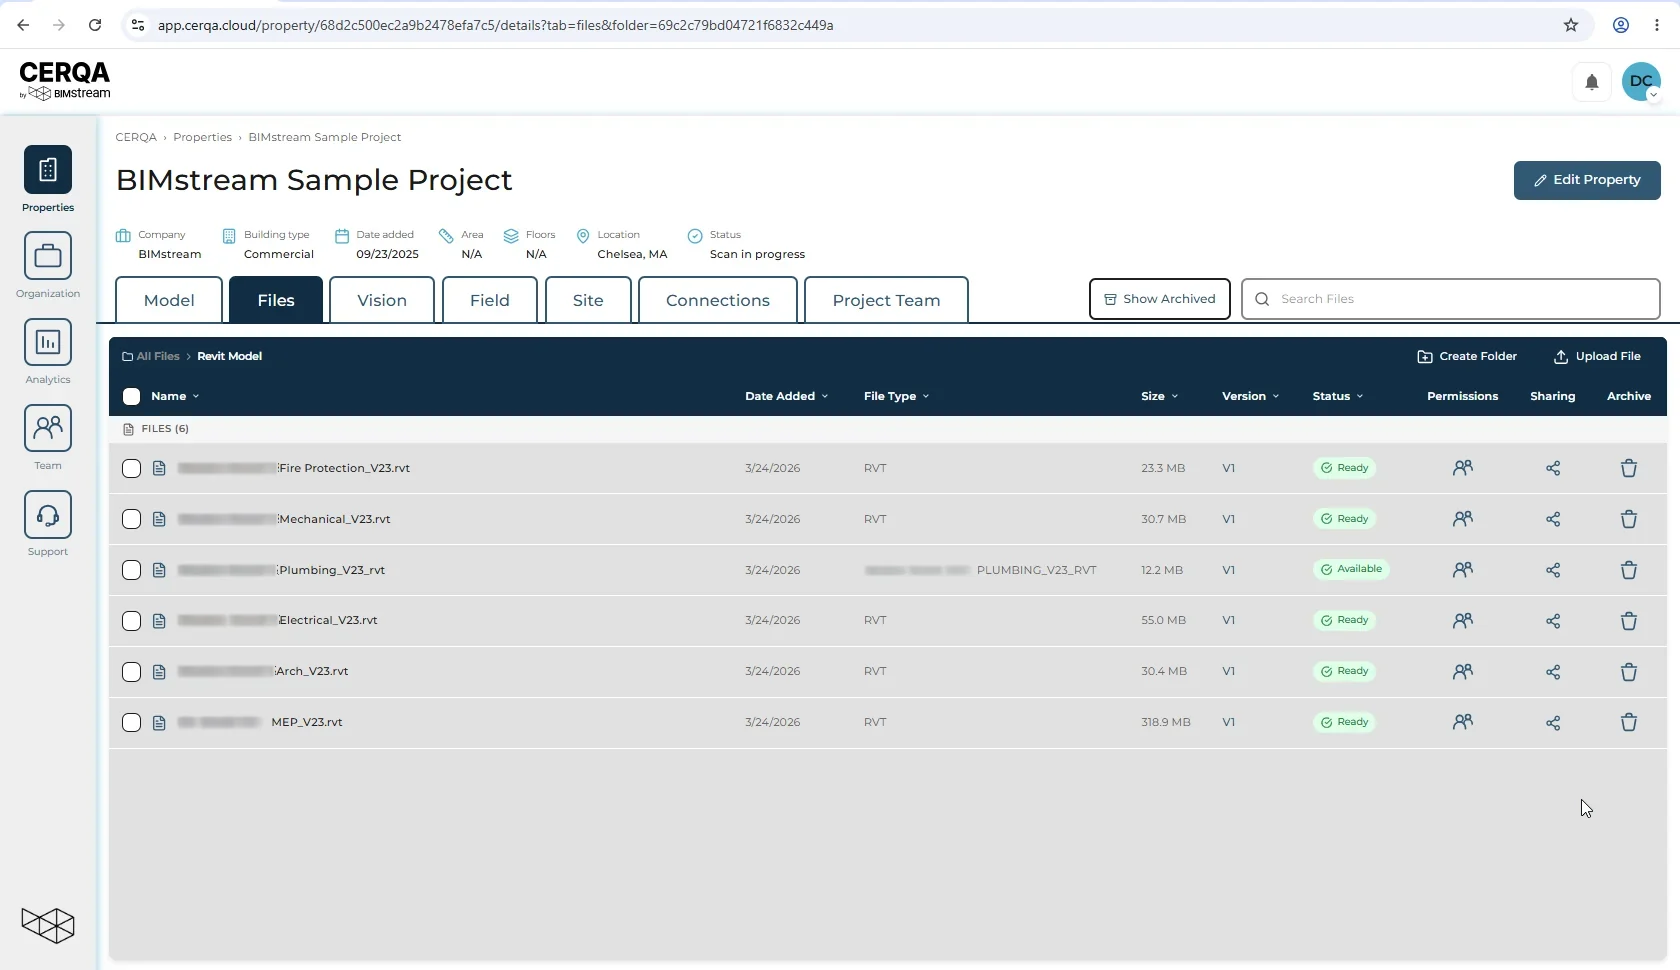
The Files tab is a single-pane file list. Folders and files both appear as rows in the same pane. A breadcrumb at the top of the list shows where you are (the root reads All Files; drilling into a folder appends the folder name, e.g. All Files > Revit Model). Click a folder row to drill in; click a breadcrumb segment to jump back up. Folders nest by containment, not by an expandable tree.
Each row shows the item's name, date added, file type, size, version, and status, and ends with three action columns: Permissions, Sharing and Archive. Every row also carries a checkbox on the left.
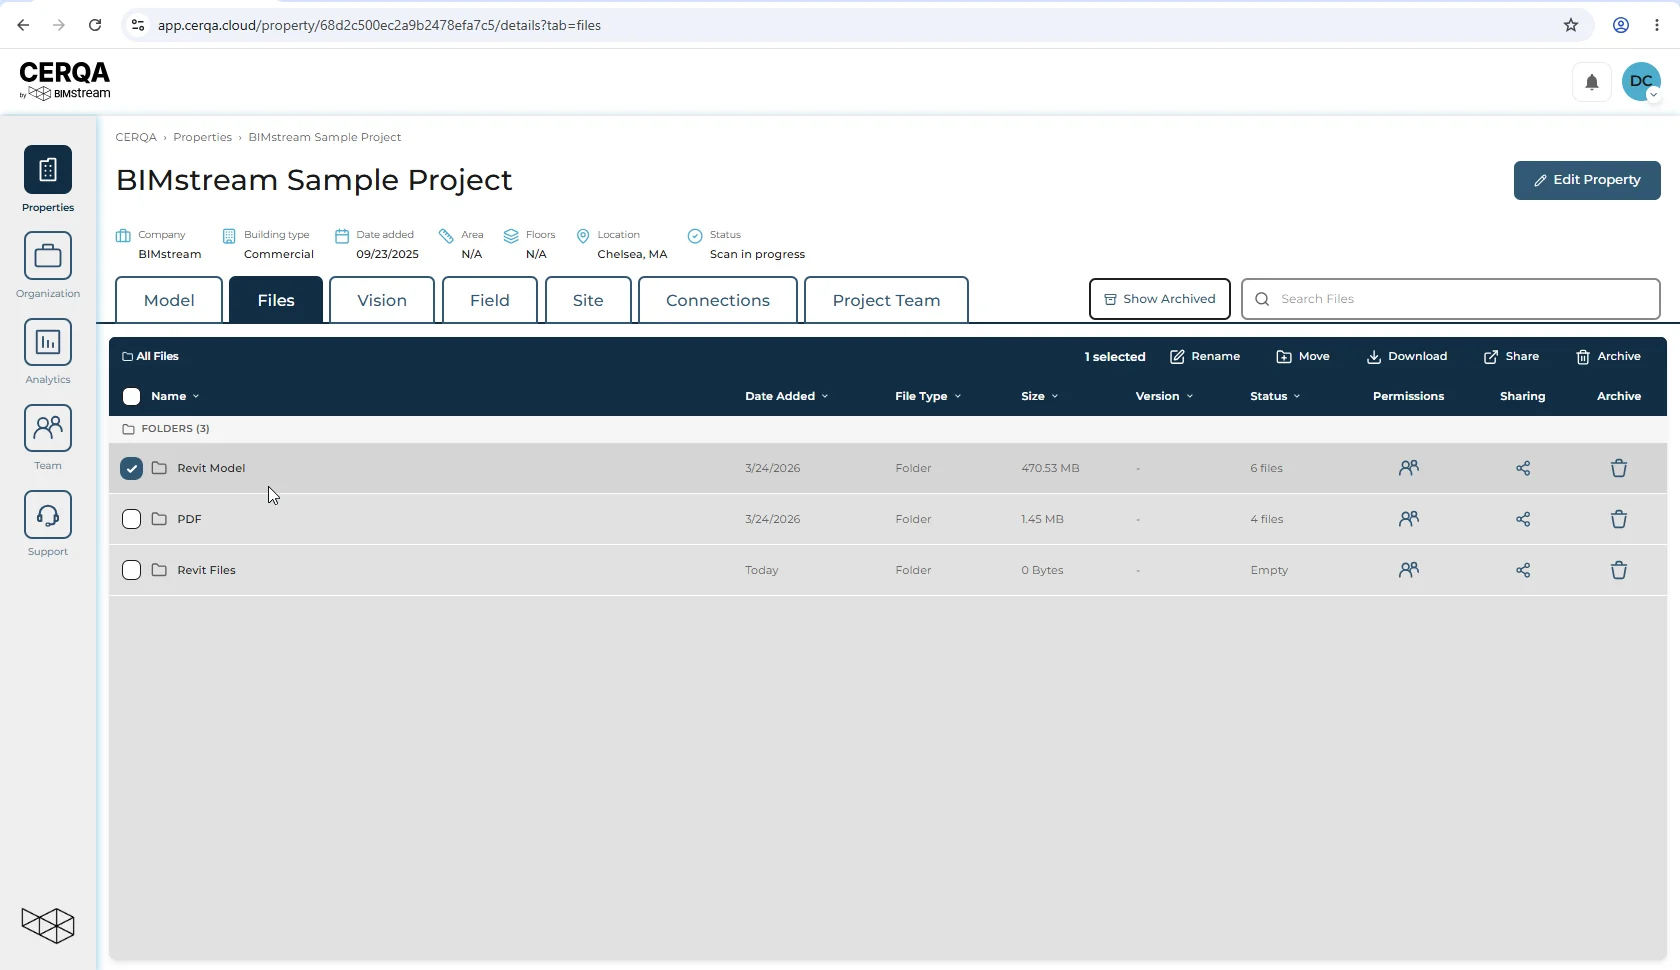
The list header changes with your selection. With nothing selected it carries Create Folder and Upload File in the top-right. Tick one or more rows and those are replaced by a selection bar reading N selected followed by Rename, Move, Download, Share and Archive - this is where actions on a file live. Above the list, the property header carries the Show Archived toggle and the Search Files field regardless of selection.
For organize-and-find flows (creating folders, moving files via the selection bar, search, bulk operations), see D-04 - Folders, search, organization. D-01 covers the overview; D-04 covers the deeper folder and search mechanics.
Accepted file types
The Files tab accepts these categories:
- PDFs (the markup workflow runs on PDFs; see D-03)
- Office documents
- CAD files (DWG and similar)
- BIM models (.rvt Revit, .ifc IFC, and related BIM formats)
- Images (PNG, JPG, and other common image formats)
- Video (MP4 and similar)
The Files tab does not accept point-cloud formats. A point cloud (.e57 and the other scan formats) is a Vision input, uploaded on the Vision tab rather than here. See FL-04 - Floor plans in Vision and in Field for that upload.
The upload dialog's summary line names fewer of these than it accepts, so a format it does not mention is not necessarily rejected.
5 GB per-file upload limit
The upload dialog enforces a 5 GB per-file limit. Files larger than 5 GB are rejected at the upload step. For very large files (a multi-GB BIM model or a high-res video), split the upload into smaller files, or escalate via CA-14 - When to call your CERQA Account Manager if a larger limit is needed for your account.
Revit files dual-surface with the Model tab
When you upload a Revit .rvt file via the Files tab, it surfaces in both the Files tab AND the Model tab on the same property once the model finishes processing. Same file, two presentation surfaces: Files for sharing and markup, Model for 3D viewing in the BIM viewer. The module name “Files & Models” reflects this dual nature. For the BIM viewer side, see M-01 - 3D Model Viewer overview.
Folders can hold any mix
Folders can hold any mix of file types. The system doesn't enforce single-type-per-folder. By convention, teams usually organize each folder around one predominant type (a PDFs folder, a Photos folder, a BIM folder) because it makes files easier to find, but this is a soft convention you can follow or break as your project needs.
Role-gated actions
The Files tab itself is universal (it appears for every role on a property as long as the company subscribes to the module). Inside the tab, specific actions are gated by role. For the complete role-by-role view of who can do what across CERQA, see F-04 - Roles and permissions. The Files-specific gates:
- 1Upload - Uploading files requires Project Manager or above; Contributor, Viewer, and Guest cannot upload. The Upload button is hidden when your role does not permit it.
- 2Share via link (the file-share path) - Contributor and above see the Share action - it follows the same edit permission that markup does. What a given share can reach depends on where the file sits and who you are sharing with, so read what the Share dialog offers for that file. Full Share-dialog walkthrough lives in D-02 - Sharing & external links.
- 3Add markup / annotations on PDFs - Contributor and above can annotate. Viewer can open the PDF read-only but cannot mark it up (the markup toolbar is not exposed); Guest has no PDF access. The markup-tool reference lives in D-03 - PDF annotations & markup.
- 4Delete and Move - Role-gated. Deleting and moving files follows the role hierarchy and the file's document permissions.
Where to go for specific flows
D-01 covers the overview. The deeper flows for the Files & Models module live in their own pieces:
- D-02 - Sharing & external links: full Share-dialog walkthrough, Link Expires (7 / 30 / 60 / 90 days), History tab.
- D-03 - PDF annotations & markup: markup toolbar, comment pins, threaded discussion, @mentions, edit/delete rules.
- D-04 - Folders, search, organization: creating folders (via the Create Folder button and modal), search, and bulk operations from the selection bar.
- PM-03 - Uploading and organizing files: the PM-specific upload + organize flow.